Introduction
Amazon Personalize is a real time personalization and recommendation service that uses machine learning to deliver recommendations to your users, based on the same technology used at Amazon.com. Announced at re:Invent 2018 and Generally Available in June 2019, it was especially exciting to see how this service could be applied to solve problems that our eCommerce, Contact Center, Media and Education customers encounter when trying to deliver exceptional experiences to their users.
Getting Started
To get started with Amazon Personalize, we defined our problem. In this case, we want to be able to recommend, based on a customer’s history with us, what product and/or service we should offer them during their next interaction with that.
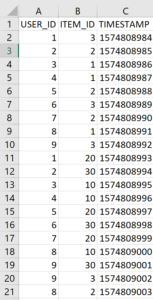
In Amazon Personalize, this would be defined in the user-item interaction dataset, where each row represents the interaction a user has to an item along with a timestamp (for example User A might have purchased Product X on Date Z).
As we didn’t have order data readily available, we generated our own sample data. If you choose to go this route in your initial test case, note you need a minimum number of unique combined historical and event interactions (1000) and a minimum number of unique users, with at least 2 interactions each (25).
Further, if you’ve worked with Amazon Forecast, you likely used a timestamp format of yyyy-mm-dd hh:mm:ss.mmm, with Amazon Personalize you will need to use epoch format.
As far as the workflow goes, you start creating a dataset import (Dataset groups > example > Datasets > User-item interaction dataset > S3) which is a CSV formatted file available in an S3 bucket that contains your user-item interaction data.
Your data will ultimately look like this:
.
As you go through the wizard to create your dataset group, if you’ve not previously defined a schema you will be prompted to do so. You can use the default schema definition, substituting the field names for the field names you used in your CSV (or vice versa).
You will also need to create an s3 Bucket policy for Amazon Personalize (another difference from Amazon Forecast), otherwise the import will fail.
After your import completes (a few minutes, based on the size of your data), you can find a summary of the job and any errors encountered during the import:
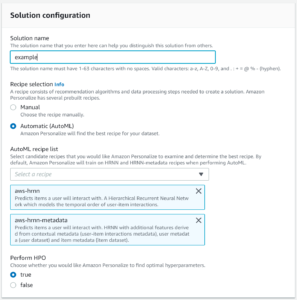
As this import was successful you can now move on to creating a solution. In this Wizard we define the recipe we wish to use. A recipe a predefined machine learning algorithm or variant; Amazon Personalize has a few to choose from and their definitions can be found at https://docs.aws.amazon.com/personalize/latest/dg/working-with-predefined-recipes.html. For our test case, we will use AutoML which will use the two recipes depicted in the screenshot, allowing us to see the results of each individual recipe and select the best one for our use case when we create our campaign:
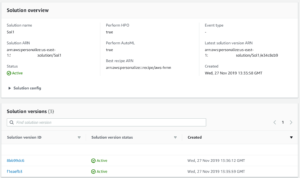
After the solution version or versions complete you can evaluate the results of the execution, and in the case of AutoML, see the results of each recipe:
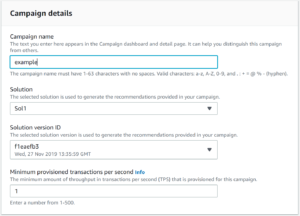
With a solution version created you can move on to creating a campaign. When you create a campaign you’ll select the solution version you wish to create the campaign against as well as a minimum number of transactions per second you anticipate making against Amazon Personalize:
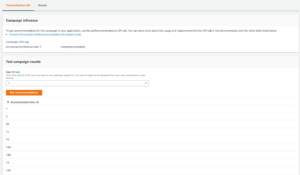
Once the campaign is created you can test it by providing a user ID (from the list of user IDs contained within your dataset), and it will respond back with recommended item IDs:
Conclusion
Amazon Personalize brings a machine learning powered recommendation service to developers and power users without requiring heavy experience in data science or machine learning. A number of use case specific recipes make the real world application of this service easy.
A clear benefit identified during the execution of this test case is the ease at which we can use Amazon Personalize to experiment – different configurations and combinations of datasets, solutions, solution versions and campaigns can be run concurrently to identify the ideal configuration for our test case, without needing to wait for one to finish before starting the other.
Further, getting started with Amazon Personalize is easy – most of the actions are Wizard driven through the console, there is a multitude of documentation available at https://aws.amazon.com/personalize/ as well as usable examples available at https://github.com/aws-samples/amazon-personalize-samples. The samples are especially beneficial to new users as they contain a CloudFormation template to create a Sagemaker Notebook Instance that has a series of Jupyter notebooks available, containing well-defined sample data sources, walking you through the steps you would need to take to perform your first test.
Next Steps
Taking this test case further, we can leverage Amazon Personalize to provide real time recommendations to customers and Contact Center agents. A starting point could be exporting customer <-> item interaction data from your order management system to s3. A Lambda function can trigger the processing and/or import of this dataset into Amazon Personalize, and create a new recipe version from it and update your campaign upon recipe completion. You can leverage the Amazon Personalize API to make real time recommendations to your customers on your website, as part of the customer’s interaction with a Chatbot, or provide recommendations to your Contact Center agents for them to make on your behalf to your customers.

